

Eigenfaces From Scratch: How Linear Algebra Learned to Tell 105 Celebrities Apart
The model that was perfect, until it wasn't
The first version of my face recognizer was flawless. I picked an image from the training set, asked who it was, and it named the right person every time.
Then I gave it a new photo of Jeff Bezos, and it confidently said Miley Cyrus.
This post covers what happened between those two moments. We'll build Eigenfaces, one of the first face recognition methods that actually worked, from scratch in Python. We'll also see why it falls apart on new photos, and which three fixes roughly tripled its accuracy on faces it had never seen.
No deep learning here. Just linear algebra, plus one SVM at the end.
A face is a point in space
Take a 64 × 64 grayscale face. Write its pixel values out in one long row and you get a vector of 4,096 numbers. So every possible 64 × 64 image is a point in a 4,096-dimensional space.
Almost all of that space is static and random texture. Real faces sit in a tiny corner of it, because every face has two eyes, a nose and a mouth in roughly the same places. If we could find the handful of directions along which faces actually differ from each other, we could describe any face with far fewer than 4,096 numbers.
Finding those directions is exactly what Principal Component Analysis (PCA) does. When the data is faces, each direction it finds can itself be drawn as an image, and the images look eerily like faces. Those are the eigenfaces.
Recognition then takes three steps:
- Describe every training face by its coordinates along the eigenfaces.
- Describe the new face the same way.
- Find which person's faces those coordinates are closest to.
The dataset
I used the public Pins Face Recognition dataset: 17,534 images of 105 people, with roughly 85 to 240 photos each. They're scraped from the web, so pose, lighting, expression and image quality vary wildly. Eigenfaces was designed for carefully lit, front-facing lab photos, so this is a proper stress test.
There's one folder per person, plus a separate folder of brand-new photos for the demo at the end:
data/
  Henry Cavil/
  jeff bezos/
  Robert Downey Jr/
  ...
test/
  jeff bezos/Jeff_2.jpg      ← new photos, never used in training
  ...
Step 1: Make every face line up
This turned out to be the most important step, and my first version skipped it.
Eigenfaces compares images pixel by pixel. Pixel (20, 30) in one image is compared with pixel (20, 30) in every other image. If one photo is a tight crop of a face and another shows head, shoulders and a tie, the eyes land on completely different pixels. To the model those are just different patterns.
My training images were tight face crops. My test photos weren't. That mismatch alone explains a lot of the Miley Cyrus incident.
The fix is to align every face before the model sees it:
- Detect the face and both eyes. I used OpenCV's YuNet detector, which returns eye positions along with the face box.
- Rotate the image so the eyes are level.
- Scale and shift it so the eyes always land on the same two pixels in the 64 × 64 output.
- Equalize the histogram to spread out the brightness values, which softens harsh or dim lighting.
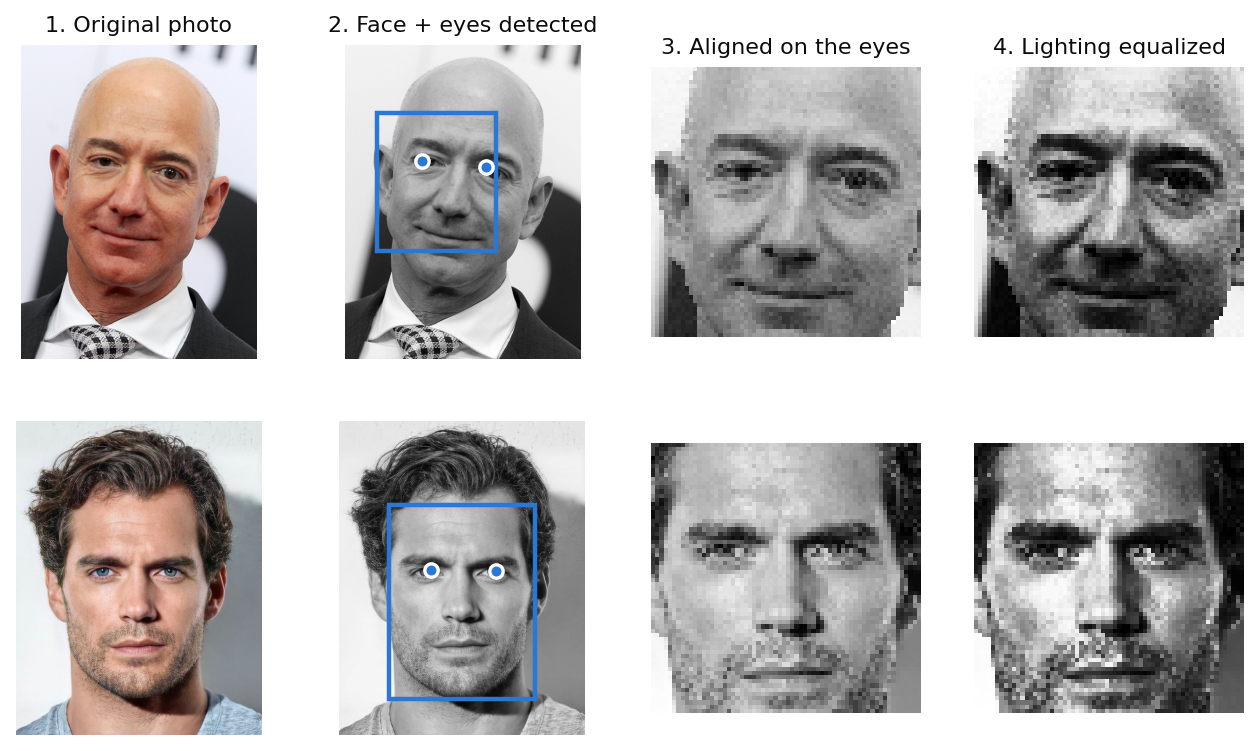 Every photo goes through the same four steps, so the eyes, nose and mouth sit on the same pixels in every image.
Steps 2 and 3 are a single affine transform built from the two eye positions:
right_eye, left_eye = face[4:6], face[6:8]          # YuNet landmark positions
eye_center = (right_eye + left_eye) / 2
eye_distance = np.linalg.norm(left_eye - right_eye)
angle = np.degrees(np.arctan2(left_eye[1] - right_eye[1],
                              left_eye[0] - right_eye[0]))

# Level the eyes, make them 40% of the image width apart,
# and place them 38% of the way down from the top
M = cv2.getRotationMatrix2D(tuple(eye_center), angle,
                            0.40 * IMG_WIDTH / eye_distance)
M[0, 2] += IMG_WIDTH / 2 - eye_center[0]
M[1, 2] += 0.38 * IMG_HEIGHT - eye_center[1]
aligned = cv2.warpAffine(gray, M, (IMG_WIDTH, IMG_HEIGHT))
Step 2: Find the eigenfaces with SVD
Stack the training images as rows of a matrix X. After holding out 20% for evaluation, that's 14,027 images × 4,096 pixels. Then:
- Compute the mean face (the average of every image) and subtract it from each row. What's left is how each face differs from an average face.
- Take the Singular Value Decomposition of that centered matrix:
The rows of Vᵀ are the principal directions: the eigenfaces. They come sorted by importance, and the singular values in S measure how much variation each one captures.
mean_faces = np.mean(X_train, axis=0)
X_centered = X_train - mean_faces

U, S, Vt = randomized_svd(X_centered, n_components=K, random_state=42)
top_eigenfaces = Vt        # shape: (K, 4096), one face-shaped vector per row
Reshape each row of Vt back into a 64 × 64 grid and you can see what the model learned:
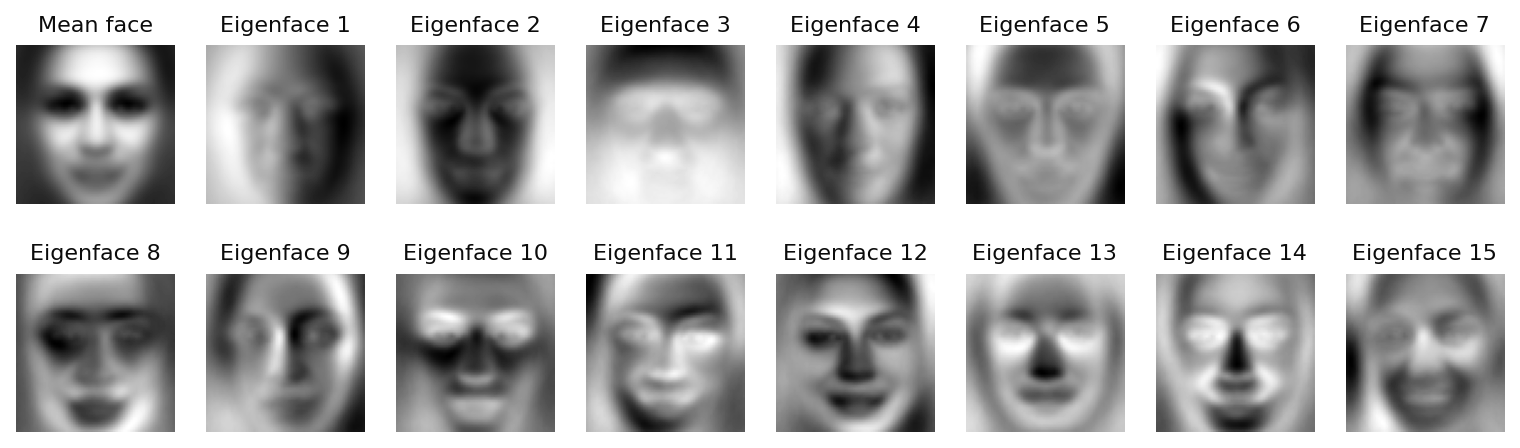 The mean face (top left) and the first 15 eigenfaces learned from the training set.
The early eigenfaces are mostly about lighting. Eigenface 1 is bright on one side and dark on the other; eigenface 3 is mostly the overall brightness of the forehead and background. Later ones pick up structure: eyebrow shape, nose length, jaw width, open versus closed mouth. Any face can be rebuilt as the mean face plus a weighted mix of these patterns.
Step 3: How many eigenfaces do we need?
Each eigenface explains a share of the total variation in the dataset. Add them up and you can see the returns shrinking fast:
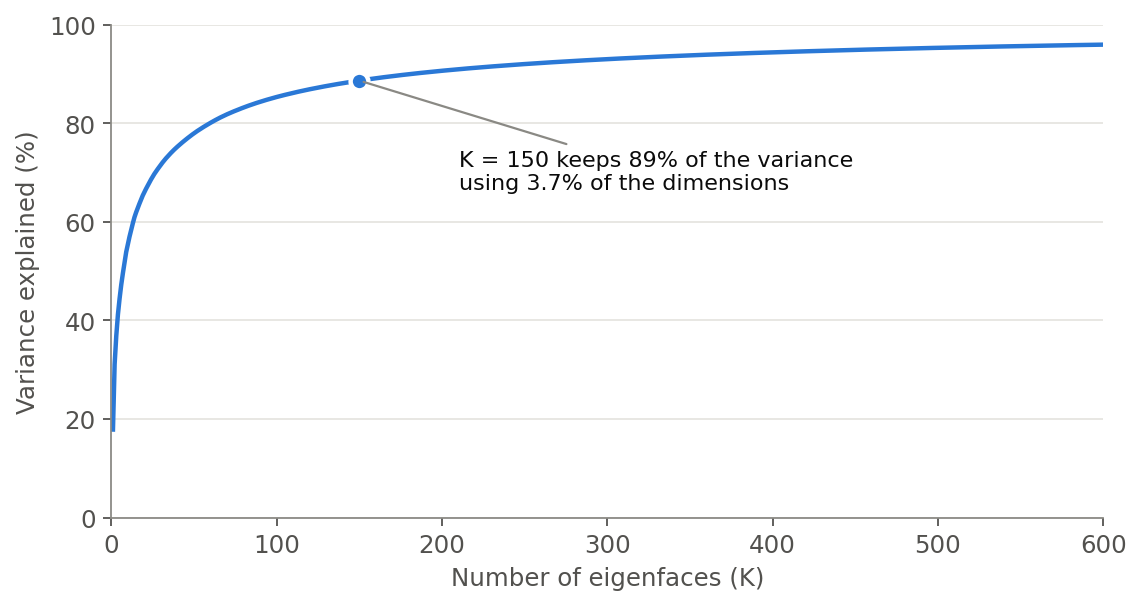 150 eigenfaces capture about 89% of the variation in the training faces, using under 4% of the original 4,096 dimensions.
You can also see it by rebuilding a face the model has never seen from more and more eigenfaces:
 With 5 eigenfaces you get a generic face and its lighting. By 75 to 150 the person's features show up. Beyond that, the extra detail is mostly fine texture and noise.
My first version used K = 2000, on the theory that more information must be better. It isn't. Those extra components describe the noise, skin texture and backgrounds of the specific training photos, and none of that carries over to a new photo of the same person. I settled on K = 150.
Step 4: Project and whiten
To recognize a face, we express it in eigenface coordinates: subtract the mean face, then take the dot product with each eigenface. Those K numbers are the face's weights, a compact fingerprint.
One more detail made a surprisingly big difference: whitening. The first few eigenfaces have much larger values than the rest, so they dominate any distance between two faces. And those first few are mostly lighting. Whitening divides each weight by that component's standard deviation, so every eigenface gets an equal vote:
component_std = S / np.sqrt(len(X_train) - 1)

def project(faces):
    """Centers faces and returns their whitened eigenface weights. Shape: (n, K)."""
    return np.dot(faces - mean_faces, top_eigenfaces.T) / component_std
Step 5: Choose a classifier
Classic Eigenfaces uses nearest neighbour: find the single training image whose weights are closest to the new face, and copy its label. It's simple, but brittle. One oddly lit photo of the wrong person, sitting near the new face, is enough to get it wrong.
A Support Vector Machine (SVM) looks at all of a person's training images and learns a boundary around them in eigenface space. With an RBF kernel those boundaries can curve, which suits the lumpy, irregular clusters that real-world photos produce:
classifier = SVC(kernel="rbf", C=10, gamma="scale", class_weight="balanced")
classifier.fit(project(X_train), y_train)
class_weight="balanced" stops the classifier from favouring people who happen to have more photos.
Does it recognize new photos?
Here's the model on photos downloaded separately from the training data. For each one you can see the original, the aligned 64 × 64 face the model actually works with, and the closest training image of the person it predicted:
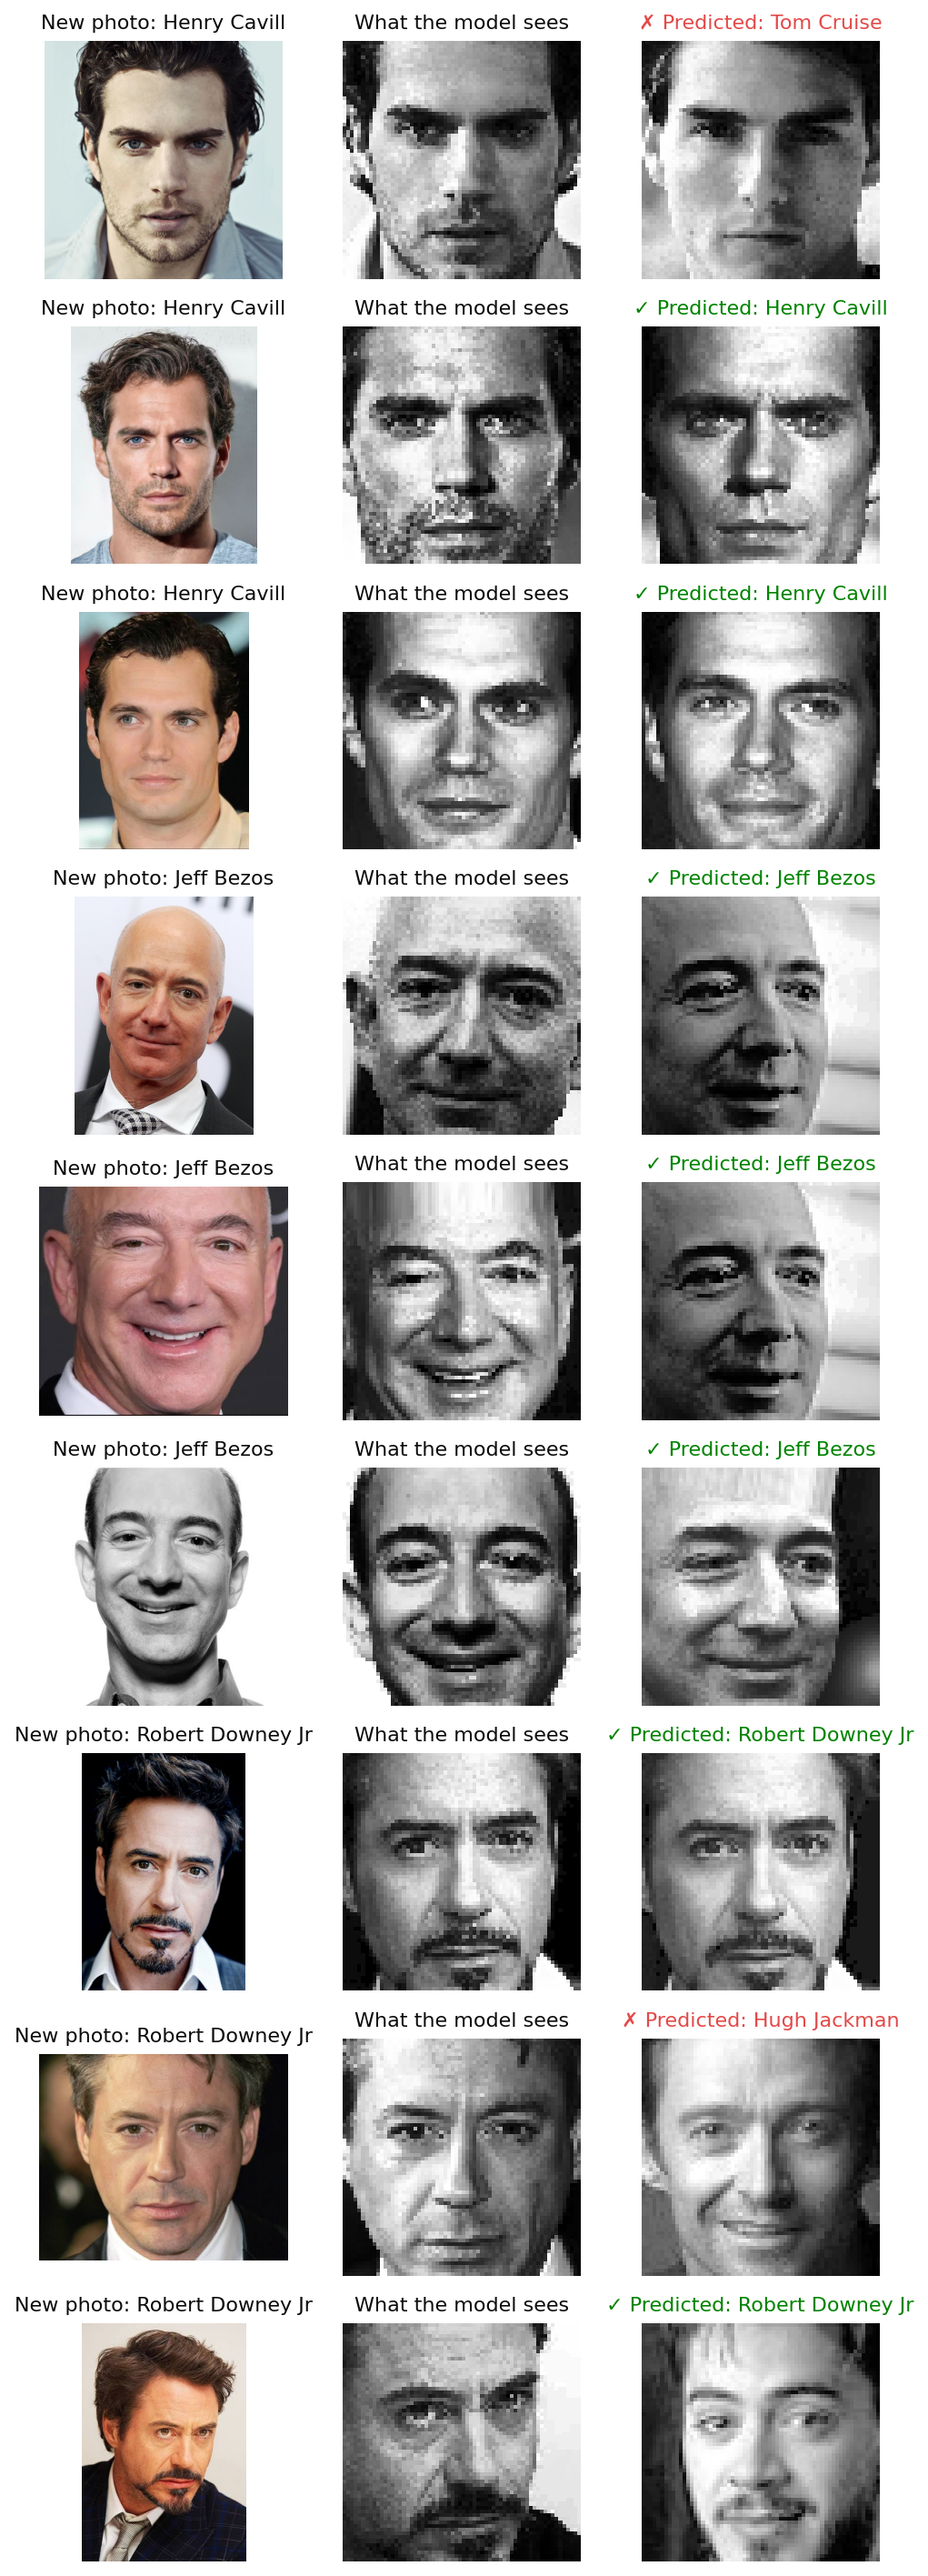 7 of 9 new photos identified correctly. Both misses, Henry Cavill as Tom Cruise and Robert Downey Jr as Hugh Jackman, are dark-haired men with similar face shapes being mixed up.
The two mistakes make sense. Eigenfaces compares the arrangement of light and dark patches, not identity in any deeper sense. Two people with similar hairlines, eyebrows and lighting can sit closer together than the same person in two very different photos.
The real score: faces it has never seen
Nine photos is an anecdote, not a measurement. For a proper number I held out 20% of the dataset (3,507 images) before training. The model never saw them, and every version was scored on them:
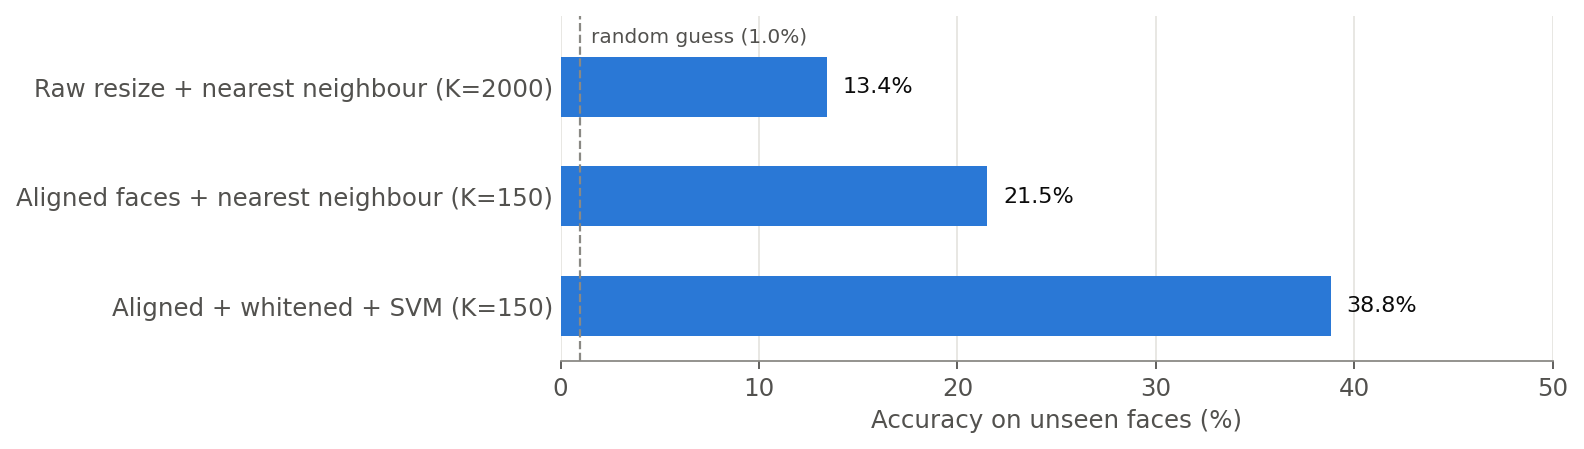 Accuracy on 3,507 unseen images across 105 people. Random guessing would score about 1%.
| Version | Accuracy on unseen faces |
|---|---|
| Raw resize, nearest neighbour, K = 2000 (first version) | 13.4% |
| Aligned faces, nearest neighbour, K = 150 | 21.5% |
| Aligned faces, whitened, SVM, K = 150 | 38.8% |
About 39% across 105 people means the model is right roughly 40 times more often than chance. That's respectable for a 1991 method running on uncontrolled web photos, and nowhere near good enough to ship.
What I learned
- Lining the faces up mattered more than the classifier. Alignment (together with a sensible K) gave the first big jump before I touched the classifier. A pixel-based model can only be as good as the alignment of its inputs.
- More components can make things worse. Past a point, extra eigenfaces fit the specific photos instead of the people in them.
- Lighting is the enemy of Eigenfaces. The strongest patterns in face images usually come from lighting, not identity. Histogram equalization and whitening are both ways of stopping lighting from drowning out the useful signal.
Where Eigenfaces stops
Eigenfaces treats a face as a fixed arrangement of pixels. It can't understand that a face turned 30 degrees, or lit from the left instead of the right, is still the same person. Every trick in this post is a workaround for that one limitation.
Modern face recognition swaps the linear projection for a deep neural network trained on millions of faces. It produces a compact embedding in which photos of the same person land close together regardless of pose and lighting, and it scores far higher on photos like these. But look at what it's doing: project a face into a lower-dimensional space, then compare distances there. That's the idea you just built.
Eigenfaces is still worth building by hand. It's one of the clearest demonstrations of what PCA and SVD actually do, and you can look at every step as a picture.
References
- M. Turk and A. Pentland, "Eigenfaces for Recognition," Journal of Cognitive Neuroscience, vol. 3, no. 1, 1991.
- L. Sirovich and M. Kirby, "Low-dimensional procedure for the characterization of human faces," Journal of the Optical Society of America A, vol. 4, no. 3, 1987.
- N. Halko, P.-G. Martinsson and J. A. Tropp, "Finding structure with randomness: Probabilistic algorithms for constructing approximate matrix decompositions," SIAM Review, 2011. (The randomized SVD used here.)
- OpenCV YuNet face detector: github.com/opencv/opencv_zoo
- Dataset: Pins Face Recognition (105 celebrities, 17,534 images), on Kaggle.
Every figure in this post was generated from the model described here.
Enjoyed this one?

Liked this issue?
Get the next deep dive in your inbox the day it drops. Plus one Friday email with the best links of the week.
Comments (0)
No comments yet. Start the conversation.